Introduction
In the last post, we looked at why we need Kubernetes. If you haven’t seen it, I recommend taking a look before reading this post. you could read this post with deeper insight.
The aim this time is to explore the many facets of Kubernetes, touching upon its core components, primary objects, and advanced functionalities. As we navigate through this guide, you will develop a deep understanding of Kubernetes’ significance in today’s application development space. So, let’s embark on this exciting journey into the versatile world of Kubernetes!
Overview
Kubernetes, a powerful and versatile container orchestration system, was developed by Google to manage and scale containerized applications. At its core, Kubernetes automates the deployment, scaling, and management of containerized applications, making it an indispensable tool for developers and DevOps teams. Its declarative approach allows users to define the desired state of their applications, while Kubernetes takes care of the rest, ensuring that the infrastructure is always in the desired state.
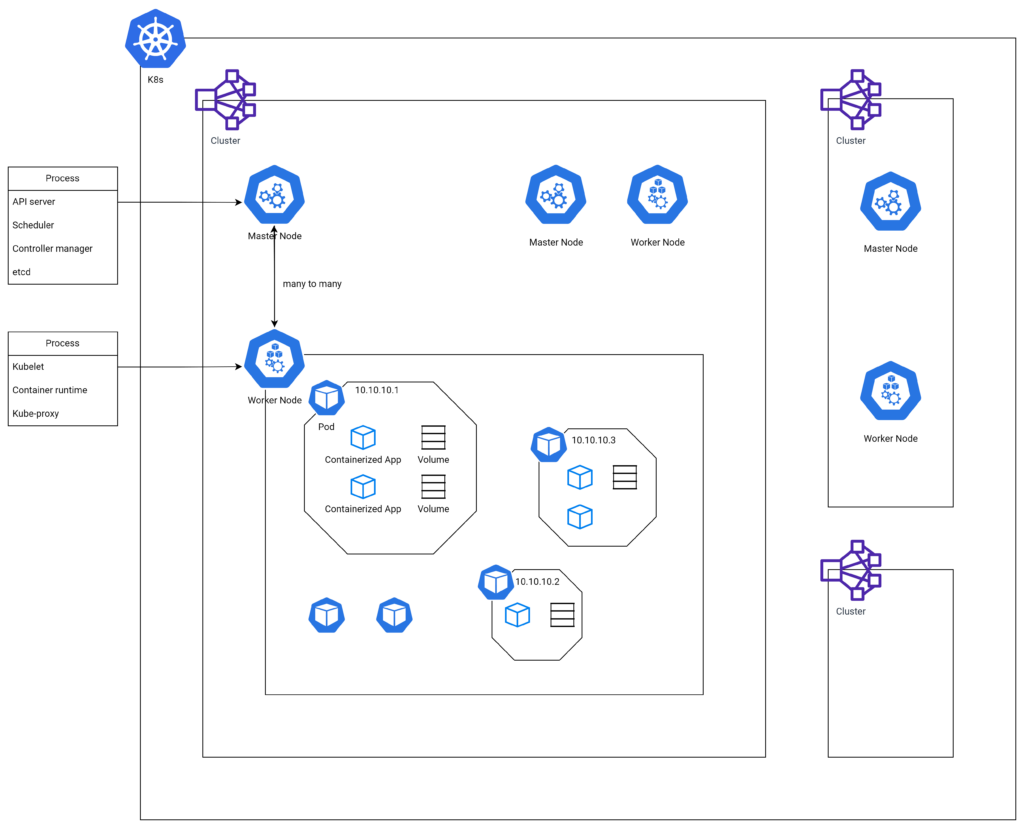
In the following sections, we will explore the fundamental building blocks of Kubernetes: clusters, nodes (master and worker), and basic objects such as pods, volumes, labels, services, and namespaces. If you are unfamiliar with k8s, you might feel burdened to understand numerous components and their relationship. If you get confused while reading this post, I recommend coming back here and looking at that diagram again. It will help you understand.
Also, we will delve into controllers like ReplicaSets, DaemonSets, Jobs, CronJobs, and Deployments. By understanding these components, you’ll be well-equipped to harness the full potential of Kubernetes in your own projects.
Cluster
A Kubernetes cluster is the highest-level concept and serves as the backbone of the entire system, providing the environment in which your containerized applications run. It is essentially a group of machines, also known as nodes, working in unison to ensure the smooth operation of your applications. A cluster provides high availability, fault tolerance, load balancing, and automated scaling, making it the ideal choice for deploying and managing large-scale applications.
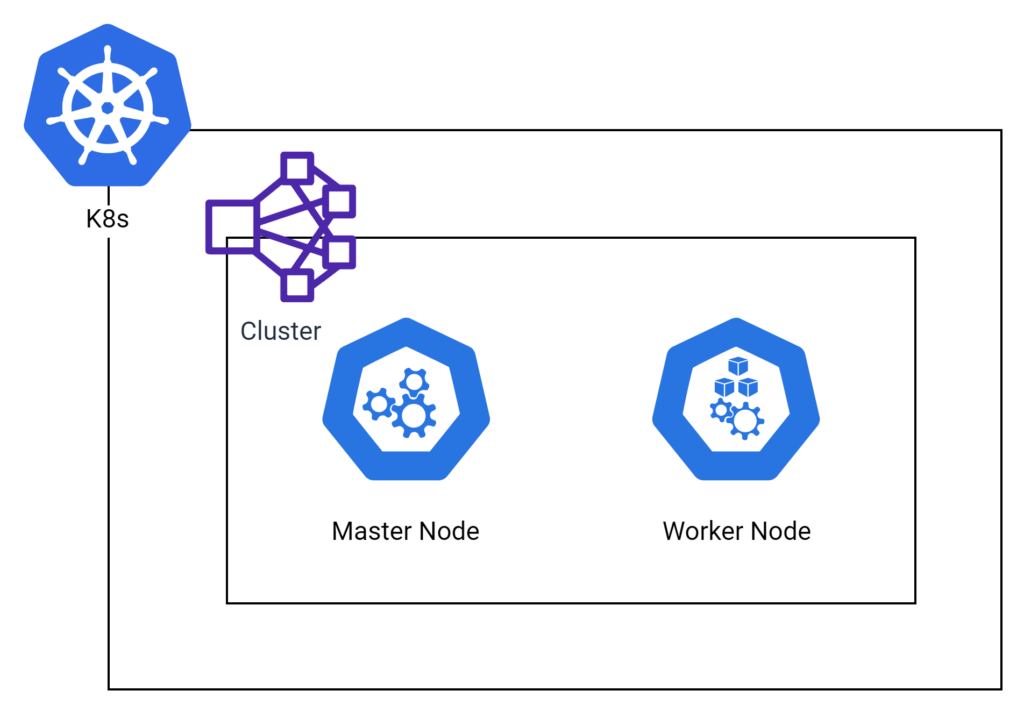
Kubernetes clusters comprise two main types of nodes: master nodes and worker nodes. Master nodes are responsible for controlling and managing the overall state of the cluster, while worker nodes are responsible for running and maintaining your applications. In the upcoming sections, we will delve deeper into the various components of master and worker nodes, helping you to gain a better understanding of their roles within a Kubernetes cluster.
Node
Nodes are the fundamental units of a Kubernetes cluster, representing individual machines (either physical or virtual) that work together to run your containerized applications. These nodes are classified into two types: master nodes, which oversee cluster management and orchestration; and worker nodes, which execute and maintain the applications. Each node contains several essential components that ensure seamless communication and interaction within the cluster. In the following sections, we will discuss the key components of both master and worker nodes, providing a clearer understanding of their functions and importance in a Kubernetes cluster.
Master Node
The master node plays a critical role in managing and orchestrating the entire Kubernetes cluster. It is responsible for maintaining the desired state of the cluster and making crucial decisions, such as where to run containers and how to handle failures. The master node comprises four key processes:
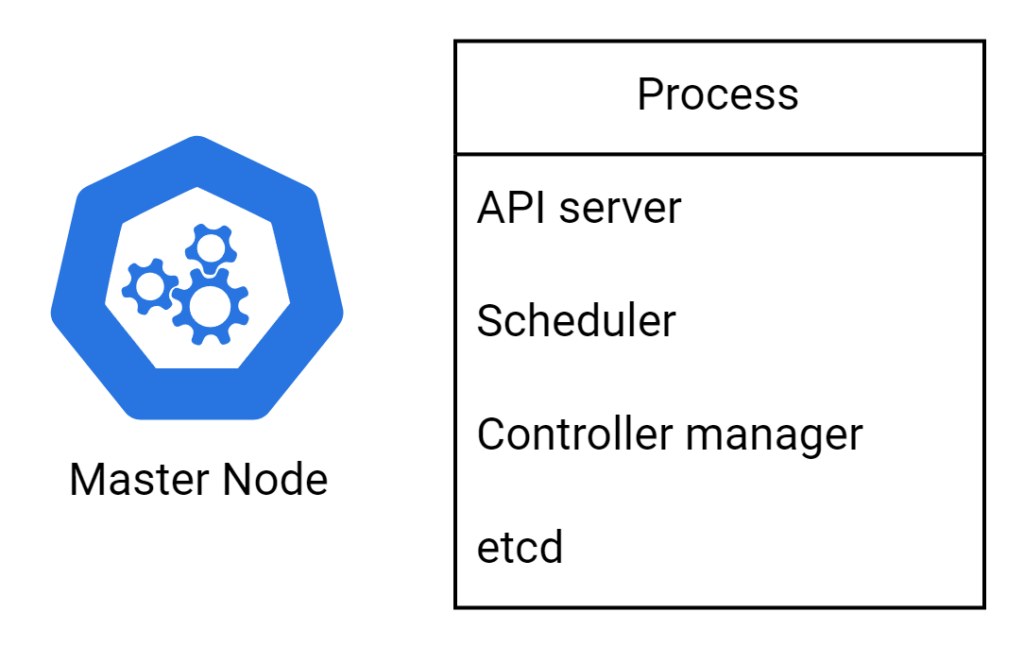
- API Server: The Kubernetes API Server is the central communication hub between all processes within the cluster. It processes RESTful requests, validates them, and updates the corresponding objects in the etcd datastore.
- Scheduler: The Scheduler process is responsible for allocating resources and assigning workloads (such as pods) to the appropriate worker nodes, based on resource availability and other constraints.
- Controller Manager: The Controller Manager oversees a collection of controllers that automate various tasks, such as managing replicas, ensuring node health, and managing service endpoints.
- etcd: etcd is a distributed, reliable, and consistent key-value store used by Kubernetes to store the configuration data of the cluster, providing a strong foundation for distributed systems like Kubernetes.
Together, these processes work in tandem to ensure that the Kubernetes cluster is always in the desired state and functions smoothly.
Worker Node
Worker nodes are the workhorses of a Kubernetes cluster, responsible for running and maintaining your containerized applications. These nodes host your applications and ensure their smooth operation, with each worker node containing several essential processes that manage communication and interaction with the master node. These processes include:
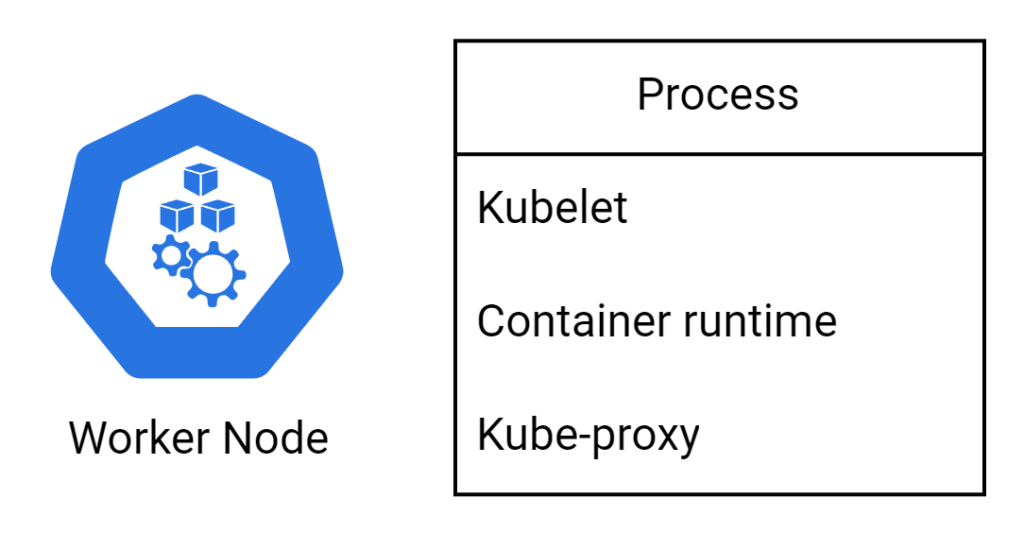
- Container Runtime: This process is responsible for running containers on the worker node. It could be Docker, containerd, or any other container runtime that supports the Kubernetes Container Runtime Interface (CRI).
- Kubelet: The Kubelet process is the primary node agent that communicates with the master node and ensures that containers are running as expected within the specified pods. It starts, stops, and restarts containers based on the received instructions from the master node.
- Kubeproxy: Kubeproxy is a network proxy process that runs on each worker node, responsible for maintaining network rules and ensuring seamless communication between services and pods within the cluster.
These processes work together to create a robust and efficient environment for your containerized applications, providing the necessary resources and networking capabilities to ensure their optimal performance
Basic Objects
In the Kubernetes ecosystem, objects are fundamental building blocks that represent the desired state of your application. These objects define how your applications should be deployed, the resources they require, and the policies that govern their behavior. While there is a plethora of objects in Kubernetes, not all of them are used frequently or essential for basic applications.
Before we dive in, It’s important to note that the term “Basic Objects” is not an official Kubernetes designation. The classification of an object as “basic” or “advanced” depends on the context in which it’s being used, as well as the complexity of the application being deployed.
In this section, we will discuss some of the most commonly used objects in Kubernetes, such as pods, volumes, labels, services, and namespaces. These objects provide a strong foundation for understanding the core concepts of Kubernetes and will enable you to manage your containerized applications more effectively.
Pod
A pod is the smallest and most fundamental unit in Kubernetes, representing a single instance of a running application in a cluster. Pods act as a logical wrapper for one or more containers, allowing them to share storage and network resources. Typically, a pod contains a single container that performs a specific task; however, multi-container pods can be deployed when multiple containers need to work closely together. This is a simple k8s YAML file to help you understand.
apiVersion: v1
kind: Pod
metadata:
  name: example-pod
spec:
  containers:
  - name: example-container
    image: example-image
    ports:
    - containerPort: 80
In a pod, containers share certain resources, allowing them to function together efficiently:
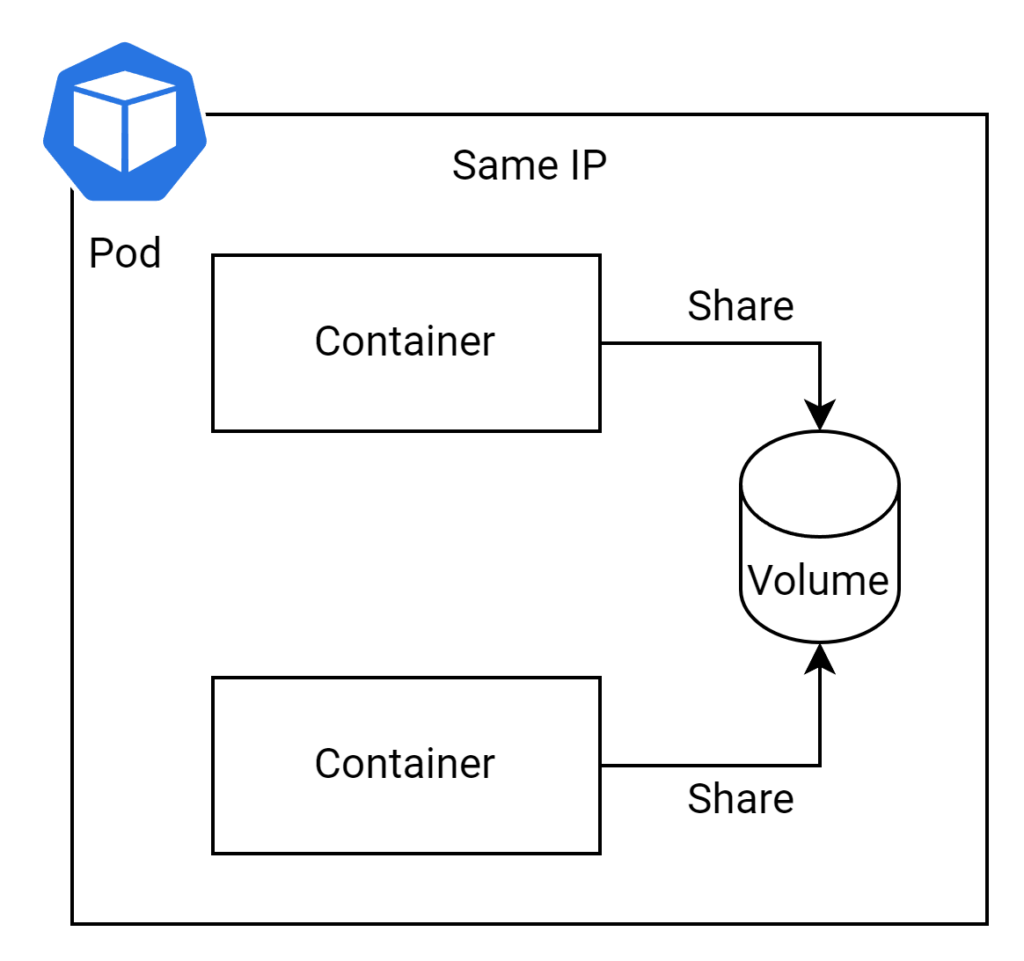
- Containers within a pod share an IP address and port space, which enables them to communicate seamlessly using “localhost.”
- Disk volumes can be shared among containers deployed within a pod, facilitating data exchange and persistence across containers.
Pods provide a straightforward and effective way to manage and deploy containers in a Kubernetes cluster, ensuring efficient resource sharing and smooth communication between different parts of an application.
Volume
In Kubernetes, volumes play a crucial role in managing and storing data for containerized applications. Volumes provide a persistent storage solution that outlives the lifecycle of individual containers, ensuring that data is not lost when a container is terminated or replaced.
One of the key advantages of volumes is their ability to be shared between containers within a pod. This enables efficient data exchange and allows multiple containers to access the same data simultaneously. For example, a web application container might share a volume for web content with a front-end container, while another volume could be used to store and share log files between the application container and a logging container.
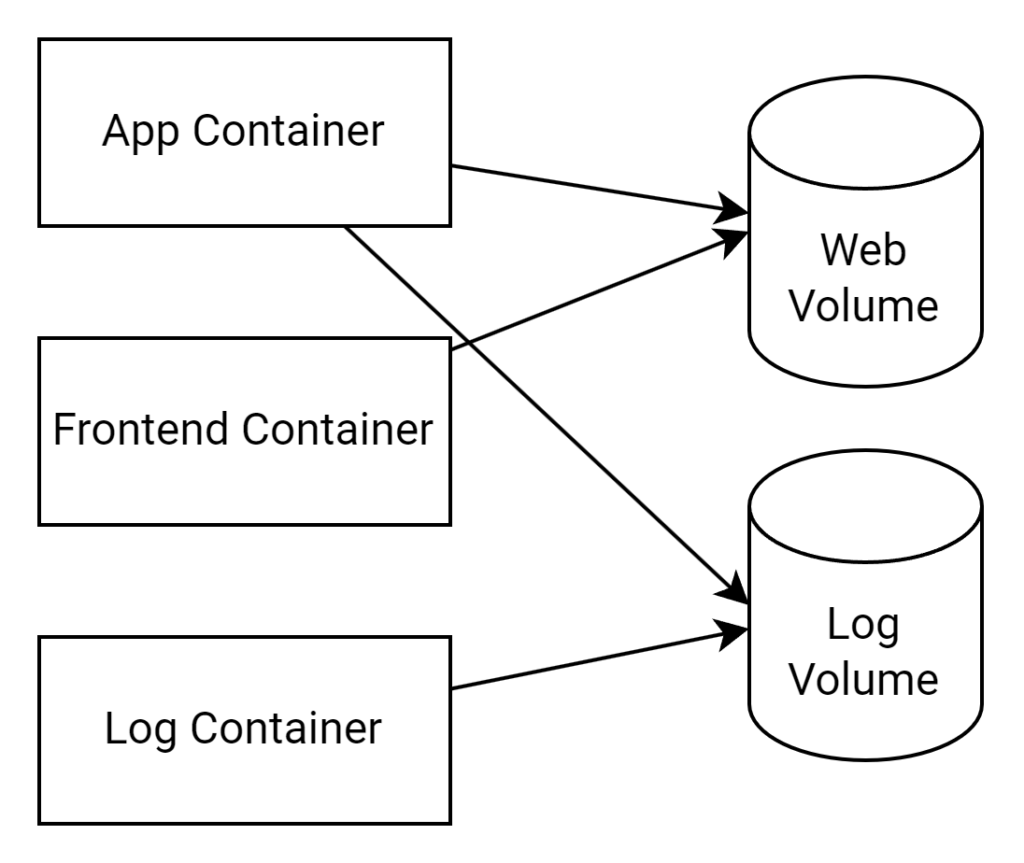
By using volumes, you can ensure that your containerized applications have access to persistent and shared storage, improving the overall resilience and flexibility of your Kubernetes deployments.
Label
Labels are simple key-value pairs used in Kubernetes to organize and categorize objects such as pods, services, and deployments. They are essential for managing large-scale applications, as they provide a flexible and efficient way to filter and select objects based on specific attributes or criteria.
Consider the following example of a Kubernetes YAML file with a label:
apiVersion: v1
kind: Pod
metadata:
  name: example-pod
  labels:
    app: my-application
    tier: frontend
spec:
  containers:
  - name: example-container
    image: example-image
In this example, the pod is labeled with the “app” and “tier” keys, each with their respective values. Labels can be used in conjunction with selectors to filter and target objects based on their labels. There are two types of selectors in Kubernetes:
- Equality-based selectors: These selectors match objects with labels that have specific key-value pairs. For example,
app=my-applicationselects objects with the label “app” having the value “my-application.” - Set-based selectors: These selectors match objects based on the presence or absence of keys or values. For instance,
app in (my-application, another-application)selects objects with the label “app” having either “my-application” or “another-application” as its value.
Labels and selectors together provide a powerful mechanism for managing and organizing objects within a Kubernetes cluster, enhancing the overall maintainability of your deployments.
Service
In Kubernetes, a Service is an abstraction that defines a logical set of pods and a policy for accessing them. Services are essential for enabling stable communication between different components of an application, as they provide a consistent IP address and DNS name, regardless of the underlying pods’ state.
A Service in Kubernetes can have different types, which define how it routes traffic to the Pods:
- ClusterIP (default): Exposes the Service on an internal IP within the cluster. This type makes the Service reachable only from within the cluster.
- NodePort: Exposes the Service on the same port of each selected Node in the cluster using NAT. Makes the Service accessible from outside the cluster using
<NodeIP>:<NodePort>. - LoadBalancer: Exposes the Service externally using a cloud provider’s load balancer. NodePort and ClusterIP Services, to which the external load balancer routes, are automatically created.
- ExternalName: Maps the Service to the contents of the externalName field (e.g., foo.bar.example.com), by returning a CNAME record with its value. No proxying of any kind is set up.
Here’s a simple example of a Kubernetes YAML file defining a Service:
apiVersion: v1
kind: Service
metadata:
  name: example-service
spec:
  selector:
    app: my-app
  ports:
    - protocol: TCP
      port: 80
      targetPort: 8080
  type: LoadBalancer
In this example, the Service is configured to target pods with the label “app” having the value “my-app.” By using a label selector, the Service automatically updates the set of targeted pods as they are created or destroyed, ensuring seamless communication within the application.

Services play a crucial role in managing and exposing applications within a Kubernetes cluster, offering a reliable and dynamic way to connect various components and maintain optimal performance.
Namespace
In Kubernetes, Namespaces provide a way to partition and isolate resources within a single cluster. They are particularly useful for managing large-scale applications or multi-tenant environments where different teams or projects need to share the same cluster. Namespaces ensure that resources are logically separated and organized, preventing conflicts and simplifying management.
Consider a cluster named “dev-commerce-platform” that hosts resources for two different shops, “a-shop” and “b-shop.” By using Namespaces, you can separate the resources for each shop, making it easier to manage and maintain their respective deployments
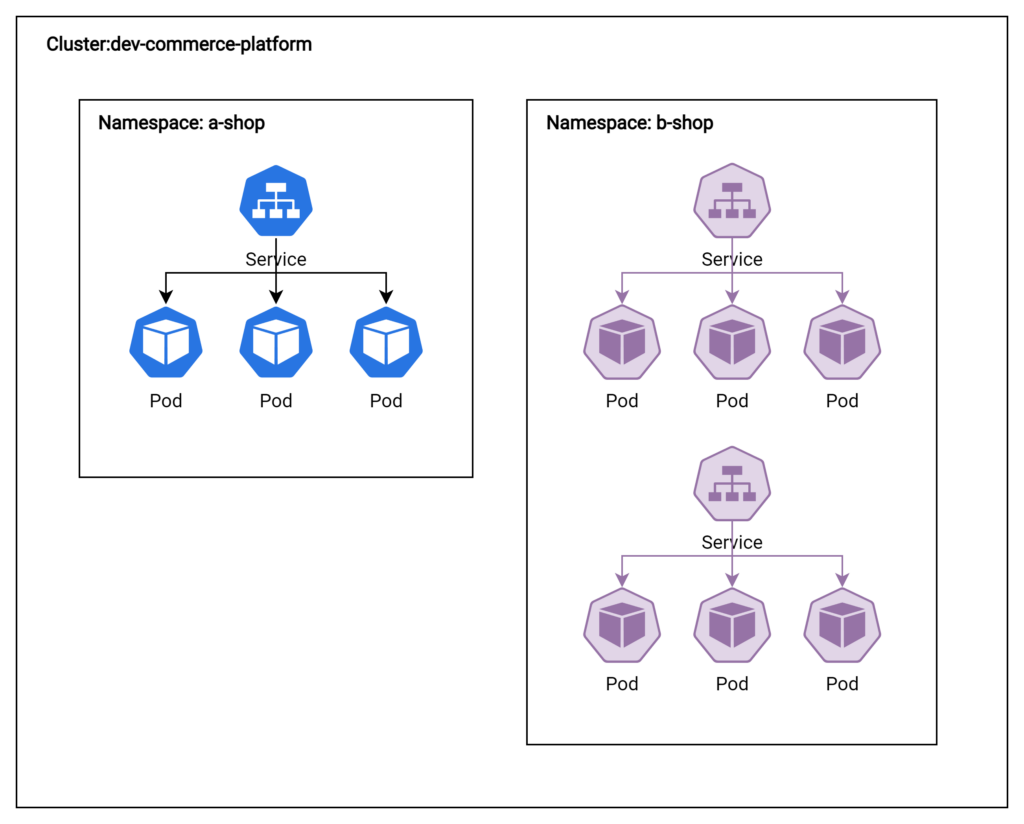
It’s important to note that Namespaces provide logical, not physical, separation of resources within a cluster. The underlying nodes and infrastructure are still shared among all Namespaces.
Namespaces offer a convenient way to manage and organize resources within a Kubernetes cluster, helping to maintain a clean and efficient environment for your applications.
Controller
In Kubernetes, Controllers are responsible for managing the desired state of various resources within the cluster and automating tasks such as scaling, updating, and self-healing. They continuously monitor the current state of resources and take necessary actions to reconcile the differences between the current and desired states, ensuring that your applications are running optimally and are resilient to failures.
In essence, Controllers play a critical role in maintaining the stability and efficiency of your Kubernetes deployments, by automating key tasks and ensuring that your applications are always in the desired state.
ReplicaSet
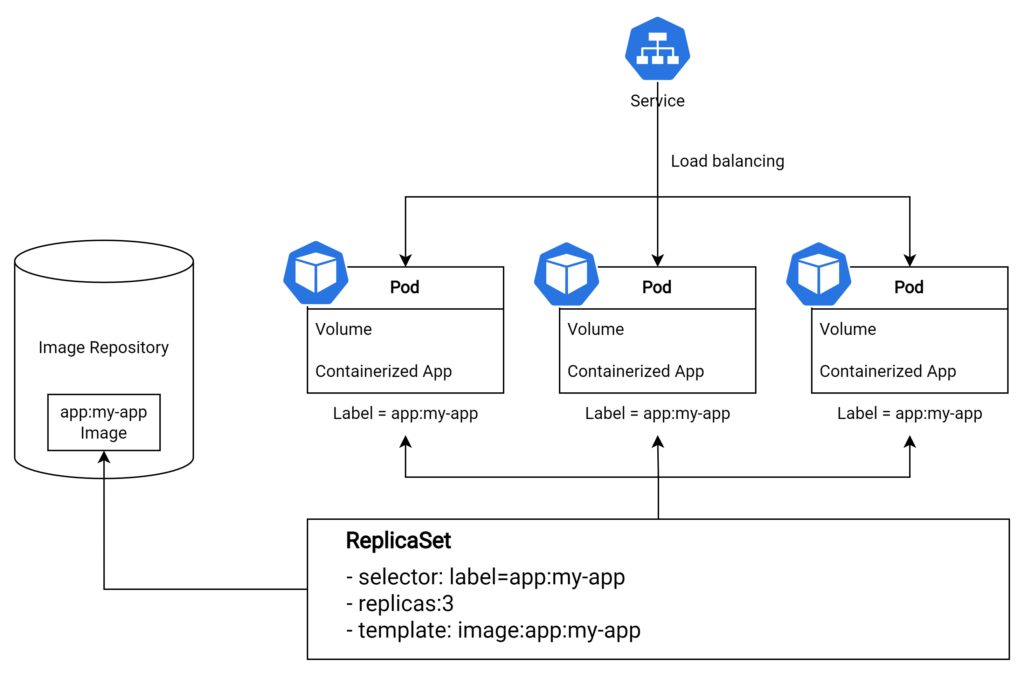
A ReplicaSet in Kubernetes is responsible for ensuring that a specified number of replicas of a pod are running at any given time. This guarantees high availability and fault tolerance for your applications, as it ensures that the desired number of instances is always running, even in case of failures or node issues.
It’s important to note that Kubernetes previously used ReplicationControllers to provide similar functionality. However, ReplicationControllers are now deprecated in favor of ReplicaSets for the following reasons:
- ReplicaSets support more advanced set-based label selectors, whereas ReplicationControllers only support equality-based label selectors.
- ReplicaSets offer better flexibility and are better suited for modern application requirements.
So it is recommended to use ReplicaSet instead of Replication Controller. Here’s a simple example of a Kubernetes YAML file defining a ReplicaSet:
apiVersion: apps/v1
kind: ReplicaSet
metadata:
  name: my-app
spec:
  replicas: 3
  selector:
    matchLabels:
      app: my-app
  template:
    metadata:
      labels:
        app: my-app
    spec:
      containers:
      - name: my-app
        image: my-app
In this example, the ReplicaSet is configured to maintain three replicas of the pod with the label “app” set to “my-app.” By using a ReplicaSet, you can ensure the desired level of redundancy and reliability for your Kubernetes applications.
DaemonSet
A DaemonSet in Kubernetes is a controller that ensures a specific pod runs on all or a subset of nodes within the cluster. This is particularly useful for deploying system-level components, such as monitoring agents or log collectors, which need to be present on every node for proper functioning.
Consider an example where you have a Kubernetes cluster with a ReplicaSet managing web application pods and a DaemonSet managing log collector pods:
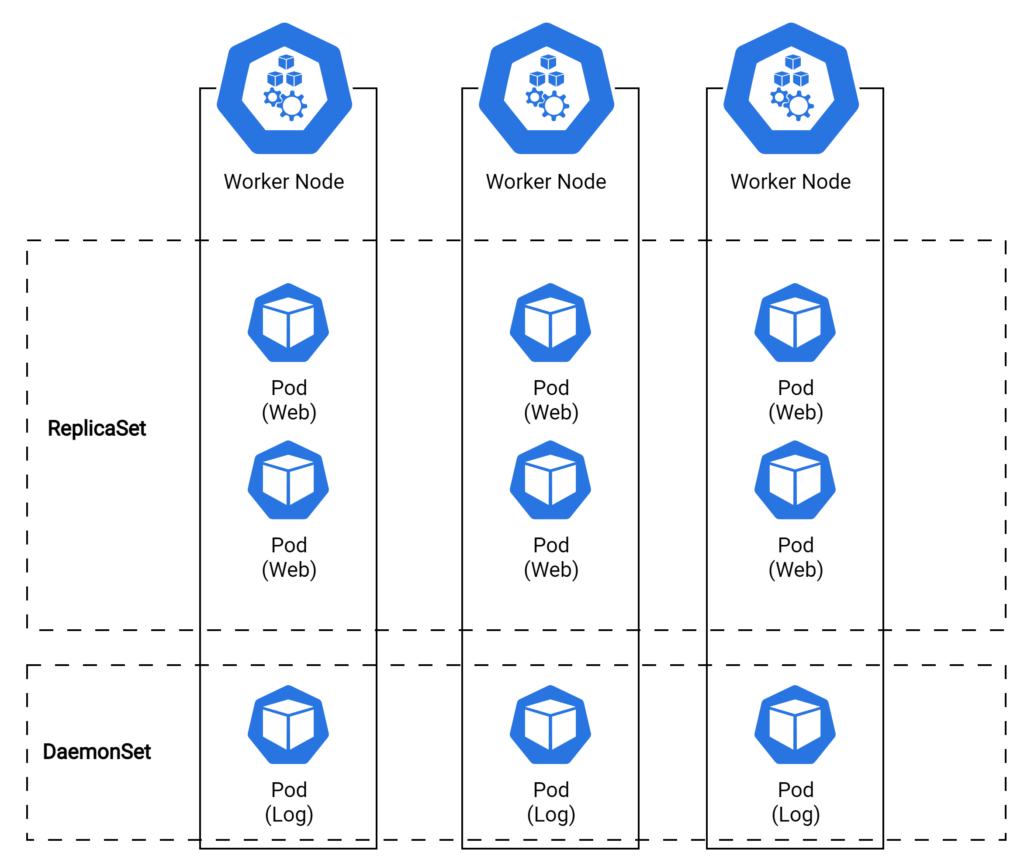
- The ReplicaSet ensures a specified number of web application pods are running within the cluster to provide high availability for your application.
- The DaemonSet guarantees that a log collector pod is running on each node, ensuring consistent and comprehensive log collection across the cluster.
The primary difference between a DaemonSet and a ReplicaSet is their deployment scope:
- A ReplicaSet maintains a specified number of pod replicas within the entire cluster.
- A DaemonSet ensures that a specific pod is running on all or a subset of nodes in the cluster.
The DaemonSet uses a selector, similar to a ReplicaSet, to target pods based on their labels. This allows DaemonSet to identify and manage the relevant pods across the cluster.
By using a DaemonSet, you can effectively deploy and manage critical system components on each node, ensuring optimal performance and consistency across your Kubernetes cluster.
Job and Cronjob
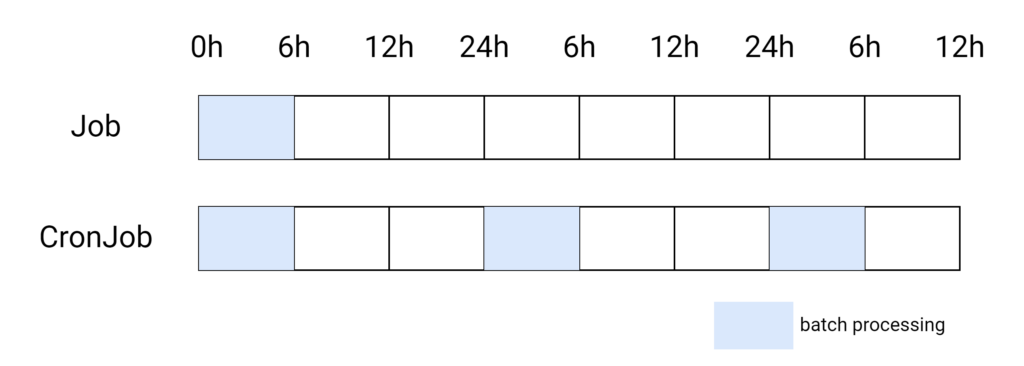
A Job in Kubernetes is a controller designed to manage short-lived, one-off tasks or batch workloads. Jobs ensure that the specified number of instances of a pod successfully complete their tasks, and then terminate. This is particularly useful for running tasks that must complete before other parts of your application can continue.
Here’s a simple example of a Kubernetes YAML file defining a Job:
apiVersion: batch/v1
kind: Job
metadata:
  name: example-job
spec:
  template:
    spec:
      containers:
      - name: example-container
        image: example-image
      restartPolicy: OnFailure
  backoffLimit: 4
In this example, the Job is configured to run a single instance of the pod, which will execute its task and then terminate. If the Job fails due to a node system failure, Kubernetes can reschedule the Job to run on another node, depending on the restart policy and backoff limit specified in the configuration.
A CronJob in Kubernetes extends the functionality of a Job by enabling you to schedule tasks to run periodically, based on a cron-like schedule. This is useful for running recurring tasks, such as backups or report generation, at specified intervals.
Here’s a simple example of a Kubernetes YAML file defining a CronJob:
apiVersion: batch/v1beta1
kind: CronJob
metadata:
  name: example-cronjob
spec:
  schedule: "0 0 * * *"
  jobTemplate:
    spec:
      template:
        spec:
          containers:
          - name: example-container
            image: example-image
          restartPolicy: OnFailure
the CronJob is configured to run a Job every day at midnight. The Job’s pod will execute its task and then terminate, similar to the Job example above.
By using Jobs and CronJobs, you can effectively manage short-lived tasks and recurring workloads within your Kubernetes cluster, ensuring that essential processes are executed as needed.
Deployment
A Deployment in Kubernetes is a higher-level abstraction that automates the management of ReplicaSets and provides declarative updates for your applications. Deployments are useful for managing stateless applications, ensuring that the desired number of replicas is always running, and handling rolling updates or rollbacks when new versions of your application are released.
Here’s a simple example of a Kubernetes YAML file defining a Deployment with the RollingUpdate strategy:
apiVersion: apps/v1
kind: Deployment
metadata:
  name: example-deployment
spec:
  replicas: 3
  strategy:
    type: RollingUpdate
    rollingUpdate:
      maxSurge: 1
      maxUnavailable: 0
  selector:
    matchLabels:
      app: my-app
  template:
    metadata:
      labels:
        app: my-app
    spec:
      containers:
      - name: my-app
        image: my-app
In this example, the Deployment is configured to manage a ReplicaSet with three replicas of the pod labeled “app: my-app.” The Deployment will ensure that the desired number of replicas is always running and will handle updates to your application as needed. The RollingUpdate strategy is specified, which incrementally replaces old pods with new ones, ensuring no downtime during the deployment process.
With Deployments, you can perform various types of application updates, such as:
- Rolling updates: Incrementally update your application by gradually replacing old pods with new ones.
- Blue/green deployment: Temporarily run two different versions of your application side by side, and switch traffic to the new version once it is stable.
- Canary deployment: Gradually roll out new features or versions to a subset of users before making them available to the entire user base.
Kubernetes provides different deployment strategies to choose from, including:
- Recreate strategy: All existing pods are terminated before new ones are created. This strategy results in downtime during the deployment process.
- RollingUpdate strategy (default): New pods are incrementally created and old pods are terminated, ensuring no downtime during the deployment process.
By using Deployments, you can effectively manage the lifecycle of your stateless applications, ensuring that they are always running in the desired state and can be updated seamlessly as needed.
If you are interested in various deployment strategies that could be also used in k8s. Here’s the post for you. This post easily explains the 8 deployment strategies using diagrams.
Conclusion
In summary, Kubernetes (K8s) is a powerful container orchestration platform that automates the deployment, scaling, and management of containerized applications. Throughout this article, we have explored the key components and concepts of Kubernetes, including clusters, nodes, basic and advanced objects, and the various types of workloads that can be managed using Kubernetes.
We delved into the inner workings of the Master and Worker Nodes, as well as the fundamental Kubernetes objects such as Pods, Volumes, Labels, Services, and Namespaces. We also examined the more advanced concepts of Controllers, including ReplicaSets, DaemonSets, Jobs, CronJobs, and Deployments.
By gaining a solid understanding of these Kubernetes components, you are well-equipped to design, deploy, and manage containerized applications effectively and efficiently. Whether you’re a developer, DevOps engineer, or IT administrator, mastering Kubernetes will undoubtedly enhance your skill set and make you a valuable asset in the world of cloud-native applications.